Let’s talk turkey! For many, this Thanksgiving may be the first time you’ve prepped or cooked a turkey, and, well, it can be intimidating. Especially when you see all those gorgeous magazine covers with perfectly browned, roasted turkeys. Don’t worry – it’s really not hard to safely prep your turkey for Thanksgiving if you follow a few key steps. It comes down to thawing, prepping, and cooking your bird.
Thawing the Bird
First, properly thaw the turkey. You want to bring the temperature of the bird down consistently so the outside and inside remain cold enough but are thawed. The most important thing to remember is that this takes time! (so if you are reading this today…well, stop here and get that bird out of your freezer now!) There are 2 ways to thaw the big guy: in the refrigerator, or in a cold water bath. Please, please, please, do NOT leave the bird on the counter to thaw! The outside will get too warm while the inside cools and you could end up with spoiled meat.
Refrigerator Thawing
This is the way the experts recommend as it brings the temperature down slowly, keeps the meat at the right temperature while the inside thaws completely. It is the safest method but it does take a few days so you need to plan ahead. The length of time is dependent on the size of the bird. (See table below) Keep the wrapper on the bird while thawing and place it in the refrigerator in a large pan (this prevents dripping over other food in case there is a tear in the package)
Cold Water Thawing
If you forgot…or are just reading this right before the big day…all is not lost! You can bring the temperature down faster but it still takes time. Keep the wrapper on the turkey and place the turkey in a pot that is large enough for water to completely cover it. Cover the bird with COLD water and let it sit for 30 minutes. Drain the water and cover it again. Do this every thirty minutes until thawed. This will keep the outside of the bird cold while the inside thaws.
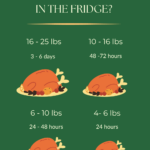
This chart is adapted from USDA and gives a basic guide. Frozen turkeys also have a guide on their package which is also good to refer to.
| Size/weight of Bird | Refrigerator Time | Cold Water Bath |
| 4 – 6 lbs | 24 hours | 2 – 3 hours |
| 6 – 10 lbs | 24- 48 hours | 3 – 5 hours |
| 10 – 16 lbs. | 48 – 72 hours | 5 – 8 hours |
| 16 – 25 lbs. | 3 – 6 days | 8 -12 hours |
Preparing the Turkey
Turkey day! Now the bird is thawed, what is next? This is honestly the easy part. Take the wrapping off the bird and remove the bag (if there is one) from inside the cavity of the turkey. This bag usually holds the neck and giblets or sometimes a bag of gravy mix. Remove it and place it in a separate bowl. (I will use the neck and giblets to make broth to use for gravy or add to the carcass to make turkey broth.)
Place the bird in a large roasting pan if you are going to roast it, in a slow cooker, or in a large pan if you plan to fry it.
DO NOT rinse the bird in the sink! You can pat the bird down with paper towels to dry it but there is no need to wash your turkey. Washing it just splashes raw turkey juice all over your sink, faucet, and counter. Okay, I’ll say it – yuck! Even wiping down the counters after you are done just won’t catch all the turkey juice.
Next is simply seasoning the bird. No need to get fancy here! Salt, pepper, a little oil or butter, and maybe some spices are really all that is needed. I like to use a blend of ground sage, thyme salt, and pepper and I rub that on the outside of the bird and under the skin where I can after I’ve rubbed a mix of olive oil and butter over top.
To Stuff or Not to Stuff?
It is safer if you don’t stuff the bird, but if you decide to, you must – make sure the temperature of the stuffing gets to at least 165°F. That may mean the meat of the bird cooks longer and ends up being dry. So…I don’t stuff my bird. Yes, I know. Some people think the stuffing tastes better when it is cooked in the bird! My solution to that is to use some of the juice from the roasting pan to season the stuffing while it is finishing up in the oven. You get that “turkey” flavor in your stuffing, but it isn’t mushy and the turkey isn’t dry.
Instead of stuffing the bird, you can add an orange or lemon or some fresh herbs to the cavity where you would put the stuffing and let those flavors infuse throughout the bird while it cooks. I love the flavor of an orange and some fresh rosemary brings to the bird! I quarter the orange and place it inside the cavity with a few sprigs of rosemary.
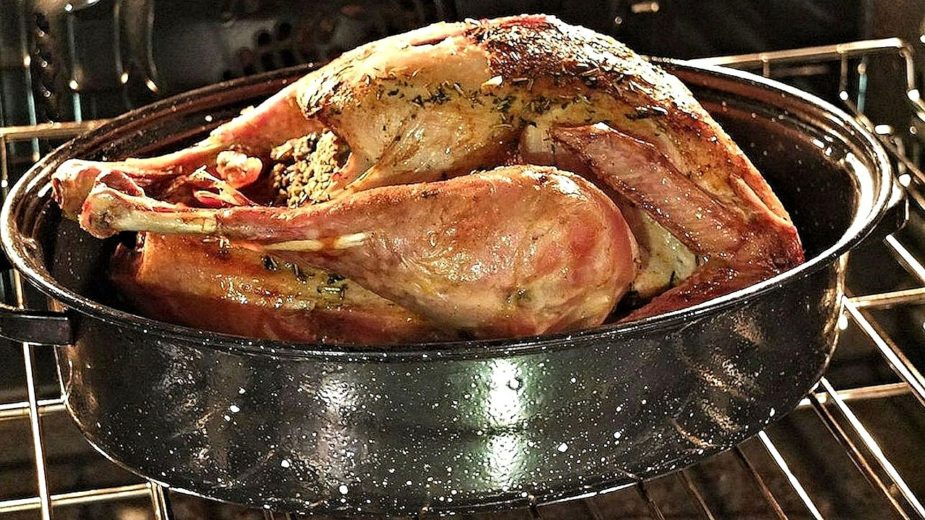
Cooking Your Bird
For this post, I’m focused on roasting a turkey. Smaller birds can be cooked in a slow cooker or deep fryer, you can grill or smoke your turkey too, but for today, I’m keeping this focused on the traditional method of roasting a turkey. Who knows…maybe I’ll get adventurous and try smoking a turkey next year!
Your bird is prepped and ready to go! Let’s get cooking!
- Preheat your oven to 425°F and position the rack so it is in the bottom third of the oven.
- Place the turkey on a rack, breast side up, in a roasting pan, or place it on top of sturdy vegetables, like carrots and parsnips to act like a rack. Place a meat thermometer in the thickest part of the thigh, but not touching the bone. I like a digital one that has a base that stays outside the oven, like this one from OXO (affiliate link) so you don’t have to open the oven to see the temperature. But any thermometer that you can leave in the meat will work.
- Once you place the turkey in the oven, reduce the heat to 325°F and close the door. Follow the chart below for approximate cooking times. You won’t need to check the bird for a few hours and it’s best to keep the door closed to keep the oven at a consistent temperature.
- About 2/3 of the way through the cooking time, open up the oven and place a piece of aluminum foil over the breast. This will help to keep it from drying out.
- Now start keeping an eye on that meat thermometer. Once the temperature of the thigh reaches 165°F as well as the thickest part of the breast, it is ready to take out of the oven. Keep in mind, if you have stuffed the bird, the center of the stuffing also needs to reach 165°F and this could take a bit longer.
- Once it is at the right temp, take it out of the oven and let it sit for a good 20 minutes before carving. This gives the juices time to redistribute, allowing for juicier meat.
| Turkey Weight | Approximate Time if Un-Stuffed | Approximate Time if Stuffed |
| 8 – 12 pounds | 2 3/4 to 3 hours | 3 to 3 1/2 hours |
| 12.1 to 14 pounds | 3 to 3 3/4 hours | 3 1/2 to 4 hours |
| 14.1 to 18 pounds | 3 3/4 to 4 1/4 hours | 4 to 4 1/4 hours |
| 18.1 to 20 pounds | 4 1/4 to 4 1/2 hours | 4 1/4 to 4 3/4 hours |
| over 20 pounds | 4 1/2 to 5 plus hours | 4 3/4 to 5 1/2 plus hours |
Leftovers
Leftovers are great and perfect for sandwiches, pot pie, soup, or my turkey rice casserole. Just make sure you pack the leftovers up in small portions (they will cool more quickly this way and get to a safe temperature faster) and put them in the refrigerator within 2 hours of taking the bird out of the oven.
So there you have it – a quick guide for how to safely prep your Thanksgiving turkey!
I hope you all have a happy and safe Thanksgiving and if you still have questions, the Butterball hotline (1-800-BUTTERBALL) can answer just about anything!